
Shutter speed is one of the three ways to adjust exposure level.
In my opinion, it is the most important way to control exposure because when it is too slow, you’ll likely have an image that is unusable.
Hopefully you got used to Program mode, at least the part where you were manually adjusting the exposure level. We’re going to learn the Shutter Priority mode which gives you one more variable to worry about. But after you master it, you probably won’t use Program mode again.

Among the shooting modes in your camera menu, either Tv or S should stand for ”Shutter Priority” This lets you pick a specific shutter speed while the camera adjusts the two other settings (aperture and ISO) to maintain the set exposure level.
How you adjust the shutter speed should be similar to how you adjusted the exposure compensation: using some kind of dial or menu. It varies for each camera.
When should I go to shutter priority mode?
Whenever you need to sharply capture motion; this includes still objects that may appear to shake because of the camera’s movement.
If you want to deliberately capture motion blur, then shutter priority mode is used to jack up the number of seconds for the shutter to stay open.
How come when I adjust shutter speed, the exposure level doesn’t change?
As you increase the shutter speed, say, from 1/30s to 1/60s, you shouldn’t notice a drop in overall lighting, if you’re in a reasonably lighted room.
Remember that shutter speed is just one component of exposure; as you move it up or down, the camera adjusts the other two – aperture and ISO – to make up what’s needed to keep the set exposure.
So how do I change the exposure value in a scene?
More complex cameras usually have two or more physical dials: one takes care of the priority setting (in this case, the shutter speed) while the other lets you control exposure value.
Try this: Instead of adjusting the shutter speed, adjust the exposure value. You should see the shutter speed value increase (i.e. go faster) as you decrease the exposure value, and vice versa.
So I increased the shutter speed to a pretty high value; now the exposure of the scene has changed, even though the exposure value is at 0. What gives?
Again, exposure is dependent on three factors. But when you jack up one value to an extreme level, the camera may not be able to physically adjust the other two factors to make up for it.
Here’s a GIF animation of my Canon 5D Mk2 in shutter-priority mode. I start it at 1/30s and jack it up to 1/4000s. Pay attention to the numbers at the bottom, and notice when the lighting level starts to go dark:

If that was too fast for you, here’s some frame-grabs: In red, I’ve circled the shutter speed indicator. In green, I’ve circled the ISO value. Aperture remains constant at 2.8:
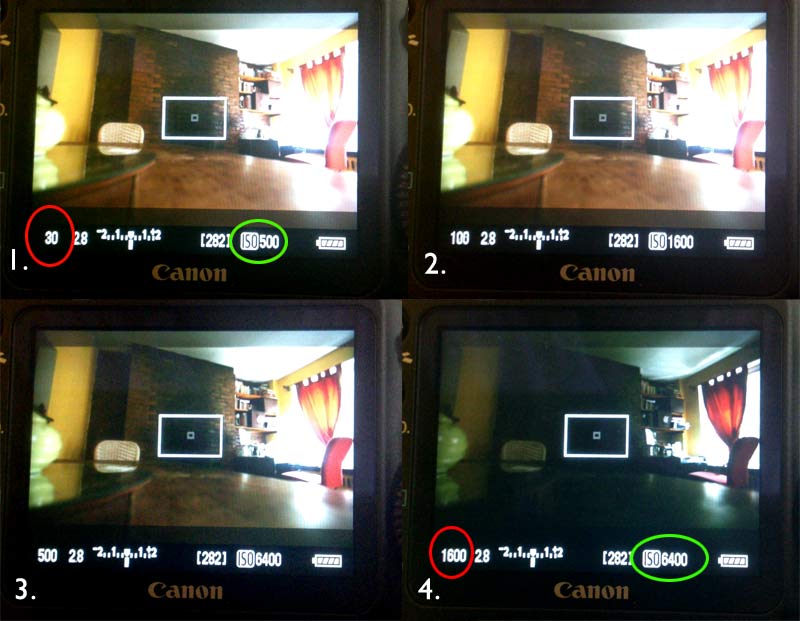
Notice how in frame #4 that the screen is obviously darkened. What is the shutter speed at? 1/1600s. What is the ISO at? 6400
Now look at frame #3, where the lighting level is the same as the previous two frames. The shutter speed is at 1/500s, but what is its ISO?
6400, the same as it was in frame #4.
We can deduce that the camera will not go above ISO 6400. Since aperture is at its low-limit, the camera can do nothing else to maintain the exposure level in frames #1 and #2.
Thus, the scene darkens.
How do I capture motion blur?
By increasing how long the shutter stays open, i.e. decreasing the shutter speed. How long you do this depends on how fast the motion is. The slower the shutter speed, the longer the light trail.


Walking around
I chose to cover shutter priority mode as our first manual mode because it’s the easiest to deal with.
In any given situation, you don’t want the shutter speed to fall below 1/50th of a second. Any slower and it’s hard to guarantee a clean shot (even at 1/50s, there’s a good chance for blur).
You’ll see in aperture-priority mode, the opposite case will arise. The aperture stays constant, so when you walk into a dark room, the camera will bring the shutter speed to a speed so slow that you’ll be unable to shoot a steady image.